Tuesday, February 7, 2012

New paint for my new end tables!!

As most of you know we were supposed to make a cross country move to Houston this May. I say supposed to because our plans have changed and Joel's conflicting school schedule is keeping us here until December. Awhile ago we had picked out colors for what will be our new bedroom. I had begun putting together this room in my mind with colors and furniture, and since we recently found some of the key pieces to what I have in mind I decided to keep putting the room together like we were moving. The main colors that we have picked out for our new room are gray with a white accent, we also picked teal and purple as our pop colors. Our new found end tables are going to be our nightstands in our new bedroom. I really love the shape of them, and they have so much room for storage that it's ridiculous! So last night after Joel got out of class at 10 we made a walmart run for spray paint. We wound up getting some Kylan duel spraypaint, it has primer and paint, we went with white, boring I know but I love how it turned out. We knew that the end tables needed a little bit of sanding,so that the paint would stick, but that they wouldn't need to be completely sanded. Since we had some sanding blocks at home we didn't buy any. I started this project by taking the hardware off of the tables, and removing the door from the tables, when I say I did this I actually mean that Matt did this :] I started by lightly sanding the doors, then I gave them a gentle coat of Krylon Dual spraypaint. I also lightly sanded the tables and gave them a few gentle coats as well. Amidst my coating I ran out of spraypaint so I ventured to the store to get some more, and I might have gotten a Diet Cherry Coke from Sonic during Happy Hour. When I got back I finished spraying and went to a meeting. After my meeting I painted the pops of color on the tables. This took forever to dry and I feel like was the most time consuming process in the entire project. Once the pops of color finally dried, it was time to glaze. I was most excited to glaze and to finally have my side tables done! Below are pictures of each step! Now to figure out what to do with the hardware. My tables, prior to transformation.
Prepping to paint.
Paint!!!
Pop goes the color!
Glaze and Amaze!
I think it's fair to say that I'm just a tad excited to finally have them, and for them to be painted. I had the best time painting my day away!The darker color is purple in real life, the same color as our cross candle holders, I'm not sure why it's turning out so dark in the pictures. I really love how they turned out! I feel like our new room is starting to fall into place, now if I can only find gray paisley Hillcrest king sized bedding my life will be complete! Ok...maybe not my life, maybe just my dreams... I think for now I'll stick to trying to figure out what I want to do as far as hardware goes.

Monday, February 6, 2012

At last my love has come along...

Ok so I know that my love has been apart of me for the past five years...the love that I am referring to is my new end tables. Anyone who knows me knows that I have been stalking craigslist, thrift stores, and even peoples homes for hexagonal end tables. You know the kind that were a household decorating staple in the 1970's? I have even had end table jealously, my wonderful Mother in Law, and my Nana have a matching set. I have even recruited dozens of people to aid in my search, but alas my years of searching is over. I have finally found a matching set!!! I was scouring craigslist this week and came across a posting that was a few weeks old for the end tables that I have been looking for. The posting was only asking for $5 for one and $10 for the set. Even though the posting was old I said a quick prayer and sent out an email inquiring if they were still available. I spent the next several days obsessively checking my email. Then last night right before bed I check my email one last time and saw a miracle! The seller replied that they were indeed still available and that for the astronomical price of ten dollars they were mine! So today during my husband's only break from class he came home and went with me to pick them up! I am just going to take a minute to brag on just how amazing he is. The man has class from 10am-10pm and he used his break to go get my end tables, because he knew they were so important to me, I am a blessed woman! So without further ado let me introduce you to my loves! Please excuse the pictures, I only had time to snap a few quick shots on my cell phone since Joel had to get back to school!
They are so worth the wait! I cannot wait to get to work on them,in fact I'm headed out to get paint now! The next time you see them they will be even more wonderful!

Thursday, January 19, 2012

Time Flies

I hate to admit that I have spent the past two weeks working on just about everything except for my blog. I have found myself ridiculously busy in this new year, and unable to keep up with all of the changes that life is bringing.I thought that I would at least show a few highlights of what has been happening in the Carman household. On January 8 we celebrated my Husbands birthday, I am constantly amazed that it has been 5 years since we started celebrating birthdays together. It's the little things that make growing old...older so much more special. We celebrated all weekend long. We started our celebratory weekend with a special night out, just the two of us! We went to town center and enjoyed some wonderful food and quality time! After we finished our delicious dinner we rented a blu-ray and spent the rest of our evening snuggling and enjoying the wonders of blu-ray. On Saturday we had a show, at the venue that we started, two of our favorite bands played. And on Sunday we spent the morning at church and had lunch with my parents and grandparents. Then we ventured back to church for Mosaic and ended the night with dinner with friends at Bdubs. I really enjoyed getting to spend such a wonderful weekend with my husband.
Since I last blogged we have hosted 6 shows at our venue which naturally makes us incredibly busy. We and by we I mean me and our friend Matt also spent several days painting the room that we have shows in. This room has always bothered me, I have always felt like a Mexican restaurant threw up in there. And for the entire time we've been involved at our campus ministry I have BEGGED to paint it.
We spent several days giving this huge room two coats of primer AND two coats of paint! We still need to bring in some accessories and pick fabric for new drapes but I could not be happier with how it turned out.
The light gray is the wall that the stage is on, the dark gray is the color of the rest of the walls and the blue is the alcove/back door. Now, that some of the craziness of a new semester is over I am hoping to be blogging more by Monday :] I hope that this year has brought you new memories and projects!

Wednesday, January 4, 2012

Tinting Mason Jars

I pinned this craft sometime over the holidays and finally got to try it out. The tutorial that I followed can be found here at http://www.momtastic.com/diy/168908-diy-tinted-mason-jars-in-rainbow I followed the steps, the only unclear things were the temperature that the oven needed to be on. I put my oven on 300, but if your oven has a warm setting, I would suggest that!

Monday, January 2, 2012

Peaks, Pits, Praises, & Prayers

I am a firm believer that marriage takes three, you, your spouse, and God. I knew that with the craziness that being SENIORS in college, launching 2 new ministries, and me making the decision to go back to work, that we would be finding ourselves busy this year. With the craziness of schedules it can sometimes be challenging for me to take time to truly pray for my husband the way that I want to. One of our resolutions for this wonderful new year was to spend time praying for one another and to keep a journal of our daily peaks, pits, praises and prayers. I have kept a journal like this off and on since I was a teenager, and it has been such a blessing to me to be able to look back and realize God's faithfulness in its entirety. We decided to do journals and write our prayers for each other daily, I am beyond excited to be doing this with my very best friend and soul mate.
Today I am going to show you how to make some wonderful journals for yourself or anyone else in your life! But before we get crafting here is a general idea of what we will share in our journals daily.Peaks of the Day: The highlights. The good moments. Something overall positive that happened during the day, big or small :] 2. Pit of the Day: The low point of the day. But, rather than just complaining about it, a way that looking back at it can be positive or a blessing in disguise. 3. Praise: Simply praising God for specific things that happened or even for His awesome love.
4. Prayers: Prayer requests that may have arisen from the new day or that have been lingering.
Then we will spend time writing down our prayers for one another :]

Supplies Needed:
*Any type of notebook, we used composition ones.
*Scrapbook paper & scissors to cut the paper,
*Letters, I cut mine out with my Quickutz.
*Modpodge, to adhere your paper, and a foam brush.


I began by tracing my notebook on the scrapbook paper and cutting it accordingly. Then I coated the front of the notebook with a thin layer of modpodge and carefully placed the paper over it. I let each side sit for a few minutes before flipping it over and repeating this process. Then I added our letters and my punch out, I used my xyron for the letters, and regular double-sided tape for my punch out. You can use whatever you have on hand or whatever works best for you. On my book I added some purple ribbon, feel free to decorate your however you wish!Here is a quick glimpse of how ours turned out!

And one last picture of them together :]

I hope that this year brings you countless blessings!

Sunday, January 1, 2012

2012

Happy New Year!
As we welcome in 2012 I am filled with excitement, and a little bit of sadness that 2011 has come to a close. 2011 was such a wonderful year for me, I got to celebrate the first of many wedding anniversaries with my wonderful husband. I was blessed with the experience of being a stay at home wife. I'm not saying that 2011 was all rainbows and butterfly's, I will admit that I did more than my fair share of wrestling with God, I had my hard days, but the I would not change it for one minute.
2012 holds so many new things for me and my husband, I have a feeling that our small family of two is in for an amazing year, even if things are not panning out the way we planned. I have decided that I want to become a very active blogger this year, and that I want to blog about all facets of my life as a new wife, student, and twentsomething. I began my blog as a way to track my domestic progression and keep up with friends and family from far away :] I am really excited to attempt to be a better blogger. Here's to a new year, and new beginnings!

Happy New Year!

Friday, December 9, 2011

Guest Post from Amanda!

Today, I am excited to have my friend Amanda guest posting. Amanda and I grew up together, and she is now a wonderful wife to an amazing husband, and a proud momma to one adorable little boy! She will soon also be a proud momma to a little girl! She blogs over at Coffee and Camouflage !Today,
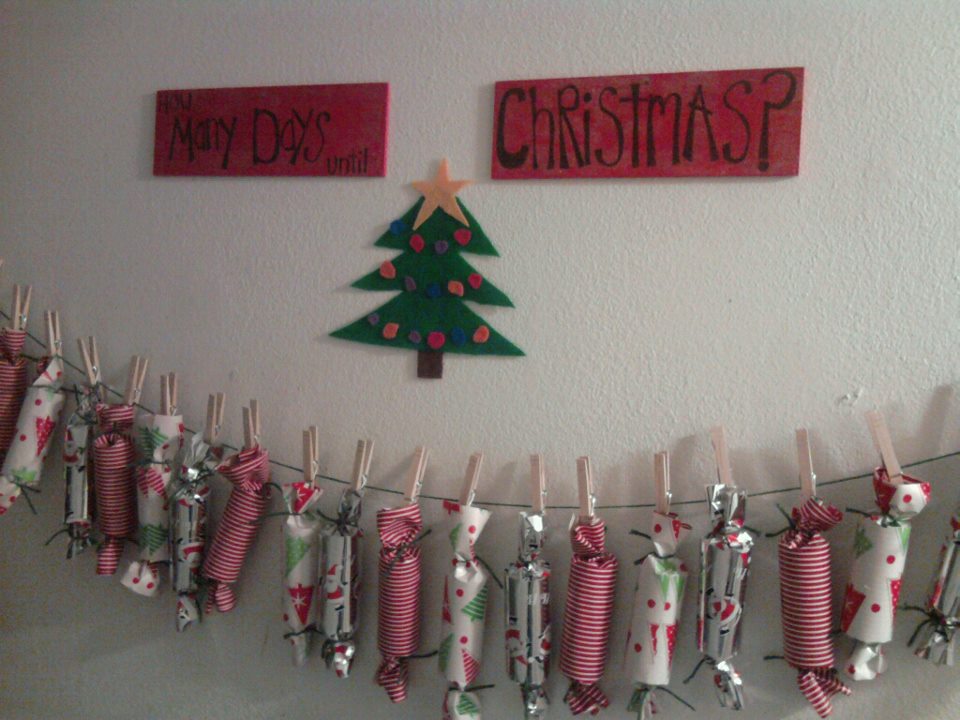
A few months ago, I delved into the world of Pinterest. Major mistake. I can get lost in all of the yummy food, hilarious quotes, and crafty ideas others pin. In fact, tonight for dinner I made a recipe I pinned last week! Shortly after I joined, I came across a lot of Christmas crafts. That started me thinking about what sort of Christmas crafting I wanted to do. I really wanted to create some sort of interactive Advent Calendar/Christmas countdown that my 21 month old could enjoy and maybe understand. As a stay at home Mom my crafting budget each month is small, so I wanted to create something with things I had around the house. My toilet paper roll collection was becoming quite large (I am pregnant and pee quite often, causing us to go through our fair share of toilet paper each month), so I wanted to try and use those. Eventually, I came up with this:


To make this simple toddler and kid friendly Christmas Countdown, I needed:
- 25 toilet paper rolls
- Wrapping paper
- Ribbon/Yarn
- Age appropriate candy/treats
- 24 Clothes pins
- Felt
- 2 wooden boards
- Paint
- Glitter Glue
- Sharpie

I started off wrapping each toilet paper roll in wrapping paper and tying off one end with yarn. In each wrapped tube, I inserted a few Reece's Pieces (one of my son's favorite small treats) and tied off the other end.

Continue wrapping all of the toilet paper rolls like this. You only need 24, but I always like to have one extra on hand, just in case. After they are all stuffed and wrapped, you can hang them on a wall.

You will need a relatively big space to display your countdown, as the rolls take up a decent amount of room. To hang, decide how big you want your display to be. Hammer a nail in on the left side at the height you want your string of rolls to start, and at the same height on the right side. Tie a string of yarn/ribbon between the two nails, remembering that the weight of the rolls will cause the string to give a bit, so make sure the knot you use on each nail is tight. You can tie the end of yarn/ribbon into a bow to give it a nice touch.  Using the clothespins, hang up each of the rolls.

To make the sign above my rolls, I dug out two small planks of wood I had from another project. I painted each one with red paint, let it dry, then coated it in a layer of glitter glue to give it some sparkle. Once the glue dried (that took quite a while, but I sped up the process with my hair dryer), I wrote "How many days until Christmas?" in sharpie. You can use any sort of method or technique to make your sign, I just used what I had on hand. I do like that they are made out of wood, however, so that I can reuse them next year.


Nail these on the wall above your wrapped rolls.

A Christmas tree made of felt completes the countdown, hung on the wall with a little bit of double stick tape.

Each night, my son picks out a roll, and either myself or my Husband helps him rip off one end. Tonight he stamped his feet in anticipation, then laughed gleefully when 4 Reece's Pieces dumped out of the roll into his hand. He may not understand exactly why he is receiving treats before bed, or what the rolls mean, but seeing his joy and knowing that I am creating new traditions with my family melts my heart.